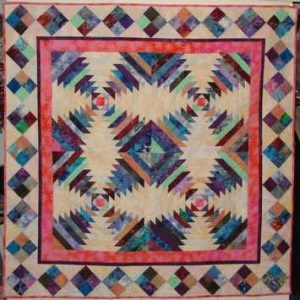
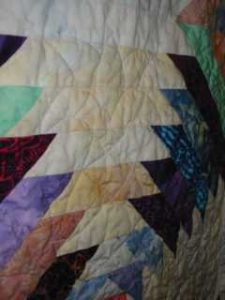
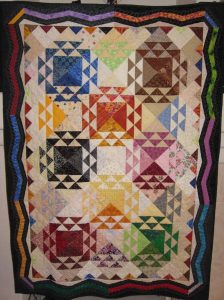
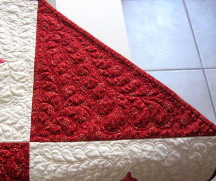
Once again, I attended Quilt Camp in the Pines in July, 2002. One of the classes I took was from Freddy Moran to learn a technique for making a pineapple quilt. I used batiks for the colored portions of the top, and the background is a mottled off-white. The pink batik in the center of each pineapple block is repeated as one of the two inner borders and again in the binding. The outer border is made of simple four-patches set on point. I’d originally intended to hang this in our entry hall as a symbol of welcome, but it grew too large for the space. Instead, it will hang over the bed in our guest room.
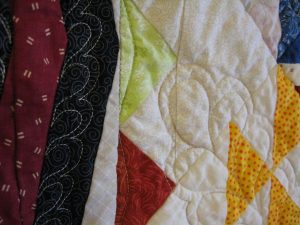
Here are details of the quilting patterns I used in the pineapple blocks and in the outer border:
As you may be able to see, I used pineapples for the quilting motifs, too — a more ornate pattern in the blocks and a simpler one in the border. The quilt was completely machine pieced and machine quilted with invisible thread, and it measures approximately 50″ square. I finished it in September, 2002.
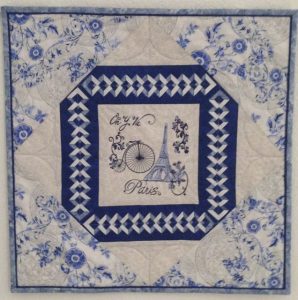
I happened to see a set of machine embroidery designs at the local quilt shop, and I fell in love with them. I used the pattern for a cushion found in Creative Expressions magazine (issue 34) to make this little (18 3/4″ square) wallhanging. The embroidered center is bordered by braids done with the Double Diamond ruler (not easy to use for a left-handed person!), and I added corded piping before the binding. I finished this in May, 2013.
Machine embroidered center, “braided” inner border.
In October, 2007, I attended a workshop given by Sharyn Craig to learn her method of making Northwind blocks. The people in the class swapped fabrics to get a variety to use in our blocks, and later I used EQ6 to figure out what border I wanted to make. I quilted feathers — one of my favorite motifs — all over this quilt. It measures roughly 42″ x 57″ and was finished in April, 2008, in time to be a wedding gift for some friends.
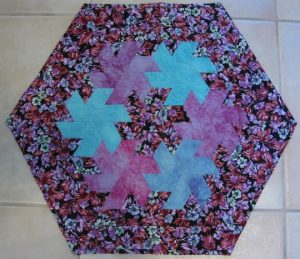
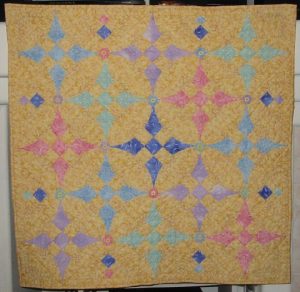
I was intrigued by Martha Thompson’s technique, outlined in her book and shown on Simply Quilts, for taking hexagons and turning them into what she calls “swirligigs”. This is one of the patterns from her book, though I used several colors of hexagons where she used a single one. I happened to have some hand-dyes in my stash, so I used them with a background that I also already had and came up with this piece:
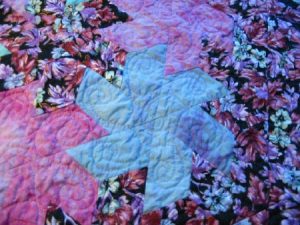
This was a fast, fun project. It took only parts of four days from start to finish! Since the hexagons-turned-swirligigs seem to have a lot of movement in them, I quilted them with a swirling pattern to underscore that movement. Here is a detail of the quilting:
The little quilt measures 21″ across the narrower dimension and 24 1/2″ across the wider one, and I machine pieced and machine quilted it, finishing in October, 2004
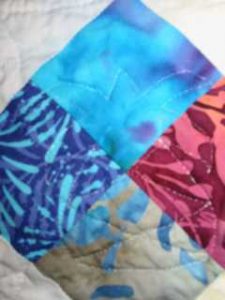
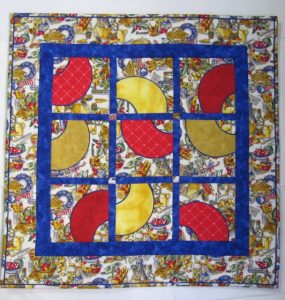
In January, 2012, some friends and I attended a retreat in Lake Havasu City, AZ; it was such fun! There, I took a class from Susan Cleveland, who developed the technique I so often use in putting corded piping next to my quilt bindings. This time, though, we used the corded piping within the blocks to go around curves — a really fun effect! Check out her book, called Piping Hot Curves for this pattern and technique. I used fabric I already had in my stash; it was pretty dated, but it’s made a cute little quilt I’m planning to use in my car when our little dog takes a ride; it will save the upholstery from getting road oil (we have a lot of road oil!) all over it from her paws.
I finished the quilt, which measures 28 1/2″ square, in February, 2012, and it has very little quilting in it, for a change. 😉 That’s because the piping in the blocks would begin to bulge if I’d quilted a lot. So I’ve quilted in the ditch and a couple of curved lines in the background of the blocks and borders. I also added piping next to the binding — of course. <g> Here’s a closer shot of one of the blocks:
In January, 2005, I took a class from Sharyn Craig on how to make the Glorified Nine-Patch with her techniques. It was such fun! I spent some time machine piecing some blocks and then drafting the setting triangles, and in a week I had the top finished. Then I waited for inspiration on how to quilt it. I finally decided to put feathers around each block, but I ended up waiting more, since I was contemplating buying a new sewing machine and didn’t want to begin quilting on one and finish on the other. 😉 After buying the new machine, I waited some more while I got acquainted with its new capabilities. So this is the first project I’ve quilted using my then-brand-new Bernina 440QE, which has a stitch regulator. I finished it in April, 2005, and it measures 37″ x 37″. I’ll use the quilt as a spring table topper in my little dining room.
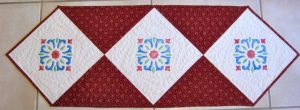
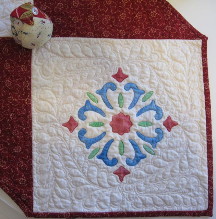
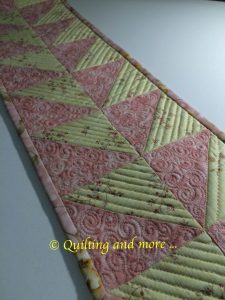
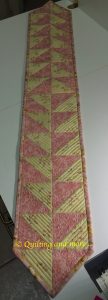
This table runner was the result of playing with paint sticks at our local group in November, 2009. I made three painted blocks and then decided to set them into a table runner.
It measures 43.5″ x 15″ and was machine pieced (what little piecing was necessary!) and machine quilted with lots of my favorite motif: feathers. Here are some details of the quilting, finished in January, 2010.
This began as a kit — a very small kit — that I was given some years previously and had put away for “someday”. I got it out and decided to make it while I debated what my next “real” project would be. As I was making the blocks, it occurred to me that it would go pretty nicely in my granddaughter’s bedroom, which was mostly pink with some yellow. Since her birthday was coming up, I decided to make it as a gift for her. I used a ruler foot on my Bernina 780 to do the free-motion straight lines in the yellow triangles and then did spirals in the pink ones.
The dresser scarf measures approximately 41″ x 6.5″, and it was made in April, 2015, for the May 1 birthday.
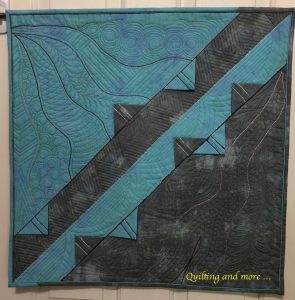
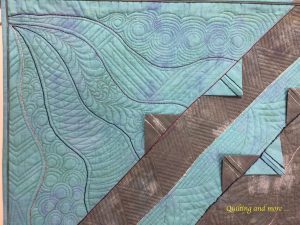
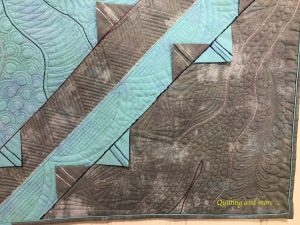
This quilt began as an idea to use some beautiful threads couched onto fabric, but I changed my mind enough times about how to approach it that it really didn’t turn out at all the way I’d intended — and so the title was born. 😉
The quilt is approximately 24″ x 24″, and the prairie points are floating in the seams, rather than attached all the way around. The quilting is a combination of free-motion and ruler work, and I added my usual piping before the binding. I finished this one in August, 2018.
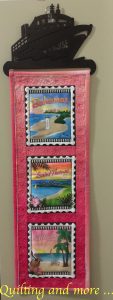
In May, 2014, I took a quilting cruise, something I’d never thought I’d get to do. But things just sort of fell together, and off I went. As a souvenir of the trip, I bought three small fabric blocks representing the three islands we visited — the same three that my husband and I had visited several years previously on our first-ever cruise! I also bought a little quilt hanger that looks like a cruise ship — very cute. 🙂 The blocks stagnated for a year before I finally put them together at the end of May, 2015. I found a gradated Moda fabric for the little borders and quilted flowers (hibiscus, sort of?) in those borders, keeping the quilting in the blocks themselves minimal. I chose the border fabric and the piping fabric in hopes of suggesting the sky colors in the blocks. The quilt measures 23.5″ x 8.25″.