I saw the pattern for this block online (the pattern is no longer online, sorry to say) and decided to make it into a table runner, which I finished in November, 2001. I didn’t have enough of any red or green Christmas fabrics to do all of the stripes the same, so I decided to use two reds and two greens in each block. It worked fine. 🙂 Then I added sashing, borders and triangular end pieces to the blocks. The finished table runner measures approximately 68″ x 16.5″. This is a photo of the runner on our table:
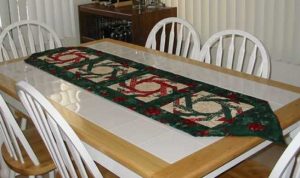
And here is a detail where you can see part of the machine quilting. I used gold metallic thread on this, since most of the fabrics had a touch of gold in them, too. The quilting motif in each block is a snowflake, though it’s difficult to see here.
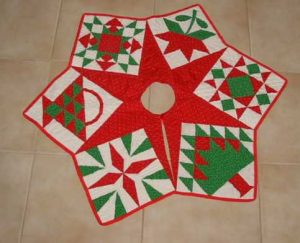
This Christmas tree skirt came from a pattern published by Susan Rand and Paula Kemperman and measures approximately 45″. I machine pieced and hand quilted this one in 1989 or thereabouts — I can’t remember! 😉
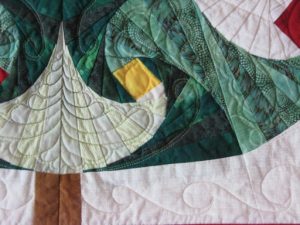
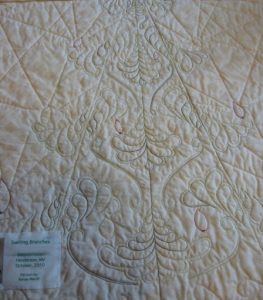
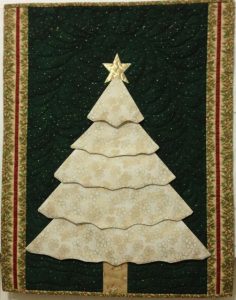
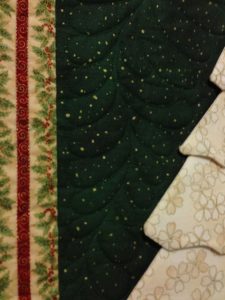
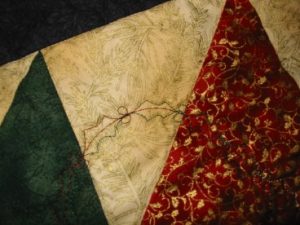
I saw the pattern for this in the November, 2010, issue of American Quilter and was immediately intrigued by the very curvy effect of the straight-line piecing. The tree itself was paper pieced, though the background was added with traditional piecing. The pattern was designed by Renae Merrill. The finished piece measures 22.25″ x 19.5″, and I machine pieced and machine quilted it, finishing in October, 2010.
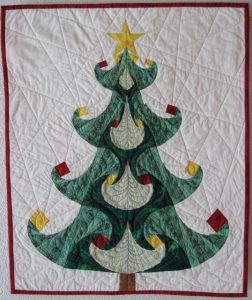
Using a variegated green thread, I put feathers into the light- and medium-green tree branches, with a swirl in the darker green. The background is done in straight lines of cream thread to suggest the light coming from the candle flames, and the area beneath the tree is done with a simple curlicue. Here are a couple of detail shots to show a bit of the quilting:
Blog post 1, 2, 3
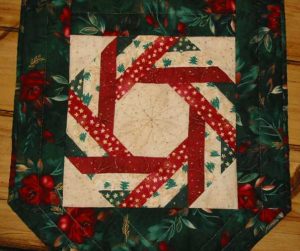
I’d been wanting to experiment with this technique, since I’d heard how much fun it is. I finally decided to try making the hexagon star pattern; it was going to be a quilted table runner. However, I changed my mind and made two small quilts for two really good friends, instead. I gave them as Christmas gifts in 1999.
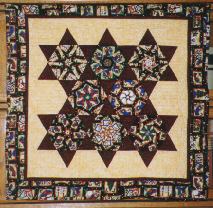
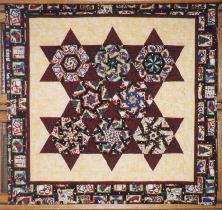
The two quilts are very small, about the size to hang over the back of a chair or couch. Since making them, I’ve decided that everything I’d heard about the Stack-n-Whack technique being fun was true!
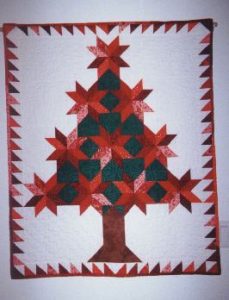
This was one of our monthly projects at Green Valley Quilters in September, 2012. The layers of the tree are attached at the top of each and then tacked down at the outer corners, giving a dimensional effect.
All of the fabrics came from my stash, including the backing and batting. It is completely machine pieced, appliquéed and quilted. The quilting behind the tree includes simple feathers behind the tree branches and wavy lines beside the trunk. There are straight lines in the border.
The quilt measures 21.5″ x 27.5″ and was finished in October, 2012.
Blog post
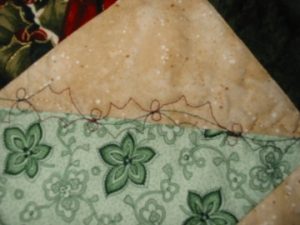
My two daughters and their families needed tree skirts, so I’ve finally gotten around to making them for them. I used the same pattern for both; it’s from Eleanor Burns’s Christmas at Bear’s Paw Ranch and was pretty easy to make, though I’ve never seen square tree skirts before. But these are the biggest ones I’ve ever seen! They measure about 51″ square, and they’d have been larger if I hadn’t made the borders narrower than specified. I used some of the same fabrics for the geese in each, but some are different to go with the different stripes I used for each skirt’s borders.

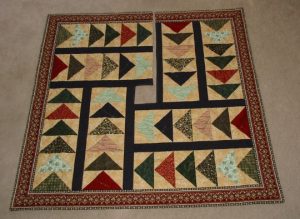
Both skirts were machine pieced and machine quilted. I used a neutral thread to stitch in the ditch along various lines in the border stripes, as well as along all of the sashings. Then I used variegated rayon thread in rich Christmas shades to make free-motion holly leaves and berries. One skirt has a garland of these leaves and berries arching over each flying goose, and the other has a long garland weaving through each row of geese. Here are a couple of details:
Both tree skirts were finished in March, 2005, in plenty of time for Christmas.
I made this wallhanging in 1999, since we thought at the time that we wouldn’t be spending Christmas at home. Huh? Let me explain. Since we weren’t going to be home, I didn’t want to put up my tree. However, I wanted something to look like a tree in order to get into a holiday mood. Hence, the idea of making this quilt was born! As it turned out, we did stay home, after all, so I ended up with this and the regular tree!
The quilt, machine pieced and machine quilted, is approximately 36″ by 44″ and comes from a pattern by Gail Abeloe (Back Porch Press). It fits pretty nearly perfectly into a little niche in one of the inside walls of my house.
This quilt is a variation on the two in Christmas Embroidery. but it’s much smaller at 12.5″ x 16″. Again, the designs came from San Francisco Stitch Co. The quilting is different, since the radiating lines on the other two would have been lost on such small blocks; I chose feathers, instead. Another difference is that, rather than the corded piping I usually add next to the binding, I used beaded piping. This technique came from Bethann Nemesh and is quite time consuming — though I think it’s well worth the effort. This quilt was finished in May, 2019.
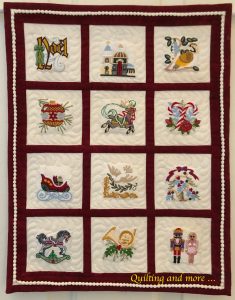
The local quilt circle I belong to had a block exchange with a Christmas theme in October, 2003. We had to select our block patterns from a list and then made them in our choice of two sizes: 6″ finished or 12″ finished.
As you can see, I grouped sets of four of the 6″ blocks together and alternated those sets with the 12″ blocks. I had four blocks left over, so those became the cornerstones for the border. I machine quilted this with a motif of continuous-line five-pointed stars in a variegated thread — a mistake, since the colors melted into the fabrics. :S The quilt measures 47″ square and was finished at the end of July, 2004.
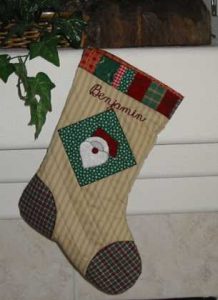
I made the first two stockings in September, 2001, for two of our grandsons. Both use machine appliqué and machine quilting. The appliqué motifs were fused onto the fabric and then blanket stitched in place. Each stocking measures approximately 16 1/2″ tall and 11″ wide from heel to toe. The first one is for Benjamin.
And this one is for his younger brother, Dominic.

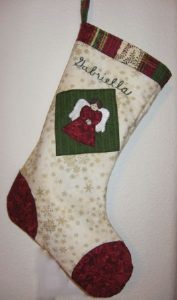
And now I’ve had to add a third stocking, since these boys now have a little sister. 🙂 I made this one, which is the same size as the other two, in September, 2007.
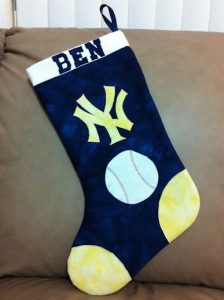
Here’s yet a fourth stocking! Our son-in-law had noted that his stocking was the only one hanging in their home that wasn’t handmade; it was one of those generic ones from a discount-type store. He had definite ideas on what he wanted his to look like, and he finally sketched those out for me so I wouldn’t be guessing. Yesterday I spent the day making his stocking, so it’s ready in plenty of time for next Christmas, since it’s only April (2012) now. 😉 Can you tell what his favorite sport and team are?
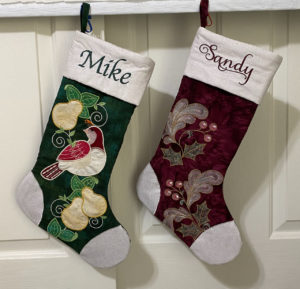
And here are the latest Christmas stockings. Since my husband and I had never had stockings, I decided to make us some decorative ones to hang on the fireplace. These were done with the embroidery module of my Bernina 790+ from a design from Embroidery Online, and I made them during Thanksgiving weekend, 2020, and they’re about 18″ tall and 7″ wide.
Blog post