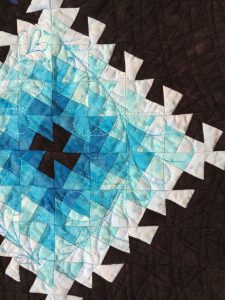
In May, 2014, I was lucky enough to be able to take a quilting cruise onboard the Oasis of the Seas. Each of the at-sea days was spent in a class, and one of the classes was a Twister class taught by Marsha Bergren. Instead of making the quilt she’d proposed for the group, though, I chose to do another that had caught my eye. This one was designed by Marilyn Foreman. Her version was to be made in any size from baby quilt on up to queen-sized. However, I decided to make mine a miniature — the first mini I’ve made without paper piecing. My finished quilt measures 22″ x 18.5″ and is entirely machine pieced and machine quilted, and I finished it in June, 2014.
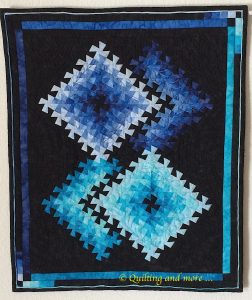
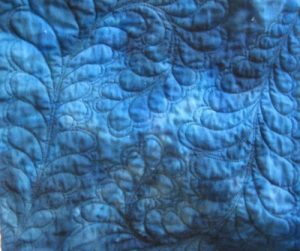
I used feathers to quilt the blue and aqua motifs, but then I experimented with curved cross-hatching (another first) for the black background areas.
Blog post 1, 2
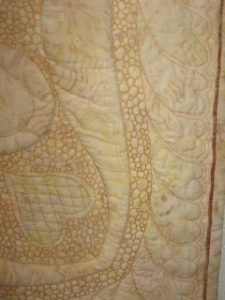
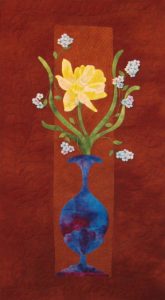
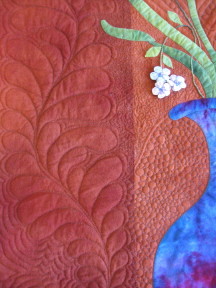
I took a machine trapunto class from Philippa Naylor at the Houston Quilt Festival in November, 2011. She gave us several patterns to choose from, and I combined elements of a couple to come up with this design. I used a combination of wool and cotton/poly batting for the trapunto layer and Superior Highlights thread for the quilting. I finished it in January, 2012, and it measures 21″ square.
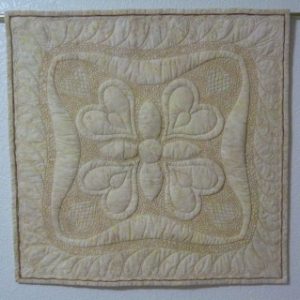
I used pebbled stippling to flatten the background behind the trapunto motifs, and I also decided to adapt the feathers I like so much so that they resemble the hearts in the main portion of the quilt. The color in this detail photo is much more true to what the quilt actually looks like.
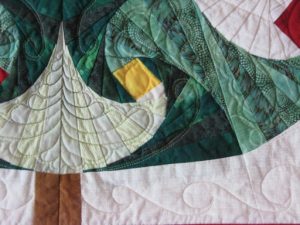
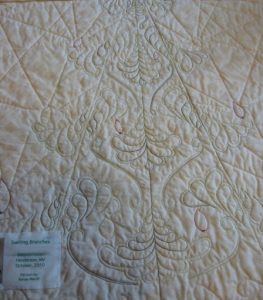
I saw the pattern for this in the November, 2010, issue of American Quilter and was immediately intrigued by the very curvy effect of the straight-line piecing. The tree itself was paper pieced, though the background was added with traditional piecing. The pattern was designed by Renae Merrill. The finished piece measures 22.25″ x 19.5″, and I machine pieced and machine quilted it, finishing in October, 2010.
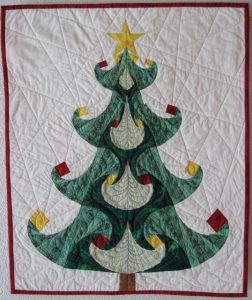
Using a variegated green thread, I put feathers into the light- and medium-green tree branches, with a swirl in the darker green. The background is done in straight lines of cream thread to suggest the light coming from the candle flames, and the area beneath the tree is done with a simple curlicue. Here are a couple of detail shots to show a bit of the quilting:
Blog post 1, 2, 3
It had been a long time since I’d done a swap, but there were two swaps in recent years among the members of my local group, and I couldn’t resist either one. The first, signature blocks, was done in October, 2010, and I really liked the idea of having signature blocks from these ladies who’ve been my friends for so long, so I participated even before I had any idea of what I’d do with the finished blocks. The second one, in July of 2011, was for exchanging half-square triangles, and that gave me the idea of combining these with the signature blocks to make baskets! Yay! I decided to set the baskets together in strips and on point, leaving room for some of the feathers I like so much. This photo of the quilt is really bad, but I needed to keep it a bit blurry to disguise names and maintain privacy. However, you can see how the baskets are set into the quilt.
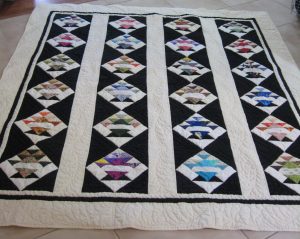
As you can see, I machine quilted feathered swags into the plain strips between baskets, as well as into the borders. The baskets are outlined, and the setting triangles have concentric V’s quilted into them. The quilt measures approximately 70″ x 87″, and I finished it in April, 2012.
Blog post 1, 2, 3
I bought my first kit when I went to the Houston Quilt Festival in November, 2010. It was a laser-cut kit for a miniature Storm at Sea, done by John Flynn. I’ve wanted to do this design for a long time and just couldn’t resist trying it this way. I think I’d normally do this pattern by paper piecing it, but this was a fun change. The pieces went together so easily because of the precision of the cutting and because the tips of the triangles had been cut off to facilitate matching. I machine quilted lavender feathers in a few of the diagonal rows, then used turquoise thread to add stylized wave patterns to the other diagonals. The outer border has larger, curlier waves, and I added corded piping between the outer border and the binding for a bit of added interest.
The center of the quilt is 14″ x 17.5″, and the finished quilt measures 21″ x 23.5″. I began working on it in late December, 2010, and finished in early January, 2011.
Blog post 1, 2, 3
Carol Doak published a mystery quilt for her online group in 2007; I made the top and set it aside. Then a baby was born to one of our nephews and his wife, so I decided to quilt this piece for their new little girl. The quilt measures about 30.5″ square and was finished in March, 2009.
It’s colorful enough that I think it will keep a baby’s interest — especially in the borders. I machine quilted sprays of feathers all over in pale pink, using a darker pink in the borders.
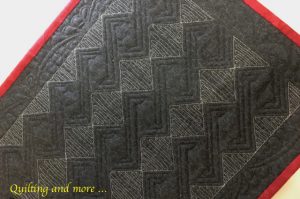
After happening across a page showing knitted projects that illustrated math concepts and seeing that one of the knits looked like it could easily be made into a quilt using half-square triangles, I drafted the idea into EQ7 to get the effect of pointed spirals around a central “post”.
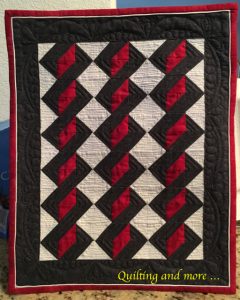
I used free-motion quilting to create softly curved horizontal lines in the white to make it recede into the background. I left the red unquilted so it would pop out a bit, and I used ruler work to echo a few times inside the almost-black shapes to give them a bit more motion. As a contrast to all of the straight — or almost-straight — lines in the central quilt, I did curves, with more ruler work, in the borders and then added pearls and small groups of feathers. The texture shows up well on the back of the quilt. I made this with 1″ finished squares for the top. The quilt measures about 12.5″ x 15.5″ and was finished in November, 2016.
Blog post
This quilt is the result of the class with Sharon Schamber on machine appliqué; I took it in order to be able to make the Dragonflight quilt. I didn’t have enough fabric to make binding, so I experimented with making a facing instead, and I’m quite happy with the result. I began the quilt in July, 2008, and finished it in March, 2009. It is entirely machine appliquéed and machine quilted on my home machine, and it measures approximately 16″ x 29″.
Below are a couple of close-up shots of the quilting. I used lots of feathers and several different styles of stippling to make the feathers show easily.

I took a class from Deb Karasik at Quilt Camp in 2008, and we made her paper-pieced pattern called Arizona Sunrise. I didn’t square off my corners, choosing to leave the quilt octagonal instead; for that I had to redesign the borders in EQ6.

Another machine quilting class from Sharon Schamber inspired the quilting on this piece, which measures about 45″ x 45″. I finished it in November, 2008, after several delays.
Here is a detail of the quilting in the large navy squares:
And here are some of the other quilted motifs:
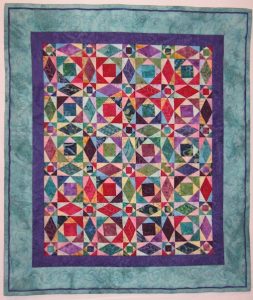
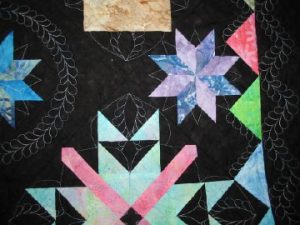
I belonged for a time to an email group called Quilt en France, which was for francophone quilters — a truly nice group of people from all over. The list mom came up with the idea of having a challenge, in which we would make a prescribed block each month and post the results online for the group to see. The blocks could be in our own choice of fabrics, which made for some wonderful differences in what had started out as the same block for each of us. When I made my blocks, I didn’t bother to redraft the downloaded patterns, so almost all of them turned out to be different sizes — a nightmare when it came time to set them together into a top. Luckily, I took a class from Sharyn Craig at Quilt Camp in the Pines in July, 2004, and she came up with some really imaginative ways to standardize the sizes of the blocks I’d decided to use. Success! (And the source of the quilt’s name.) I set the nine blocks on point and then floated Lemoyne Stars between them. The setting triangles are a Sharyn Craig idea, too, and they give the impression of an inner border. After finishing the top, I machine quilted it in variegated soft blues. The quilt, finished in January, 2005, measures approximately 56″ square.
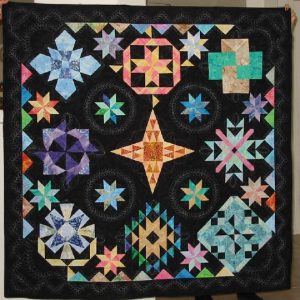
And here’s a detail of the quilting, which is mainly in free-motion feathered motifs:
The strange thing about this quilt is that I couldn’t ever figure out why I was making it — in other words, I had no plan for the finished project, which is very unusual for me. However, the reason for that became clear as I quilted it. The quilt became a gift for my terrific step-sister! So that’s where it lives now, and I hope she’s getting lots of warm use out of it. 🙂